Tuesday, November 30, 2010

4 Calling Birds

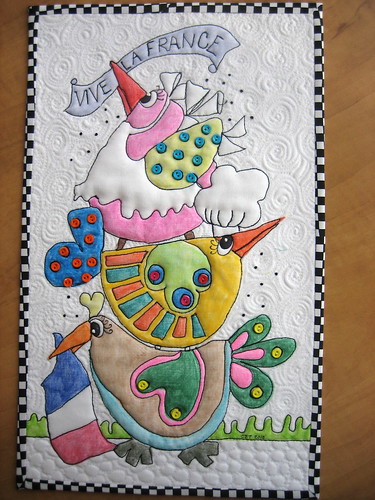
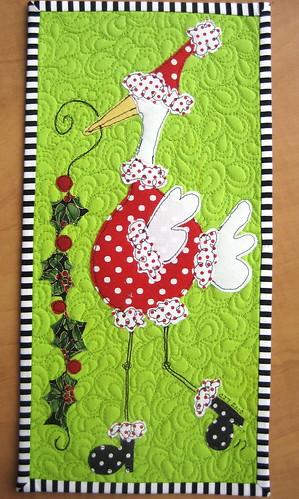
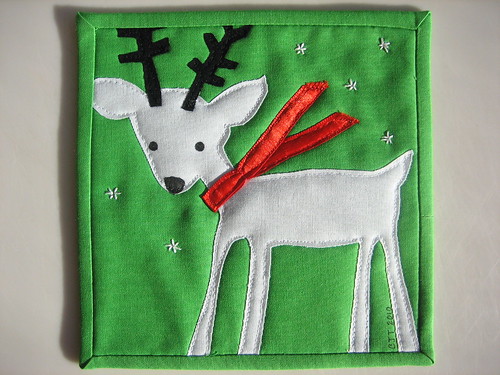
To continue the 12 days of Christmas (not in any specific order, mind you), I am going to present the 4 Calling Birds. (I actually should have made 2 Turtle Doves, I know....but I am having a heck of a time drawing turtles....sorry! I'll keep working on it....promise!!)

If you've been visiting my flickr stream you might have noticed that his mini started off like this:

4 Calling Birds - A rough sketch

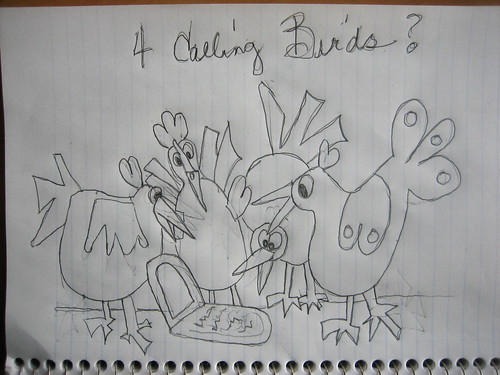
That was quickly scribbled on a 6x9 sheet of my spiral notebook that I use for grocery lists....(now you know what's more important! LOL) I could hardly make something out of that though, so after being posted on my refrigerator for a few days, I transferred the idea onto something workable:

At this point I really considered doing applique, but after a while decided that the whole 12 days should be the same and since I did "peacock" and "three hens" in crayon, I should continue with that medium. Besides, that goes lots faster for me now. With applique, it seems I have to audition tons of fabrics to get them just right. With crayons, it's just a matter of testing colors on a separate piece of fabric.

As I've explained before, I transferred the image to fabric (cut a bit bigger than my pattern), backed it with freezer paper for stability and colored away:

If you try this process yourself, please don't get discouraged at the image right after you're done coloring. It really doesn't look like much at this stage, but it does get better after it continues, so be patient.

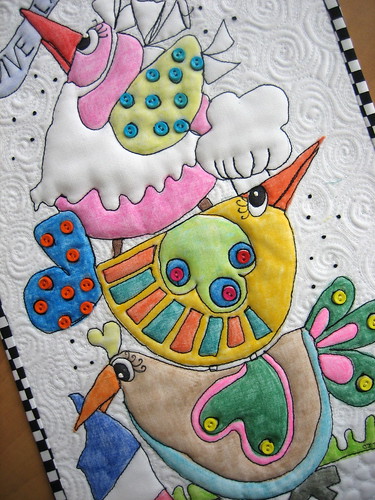
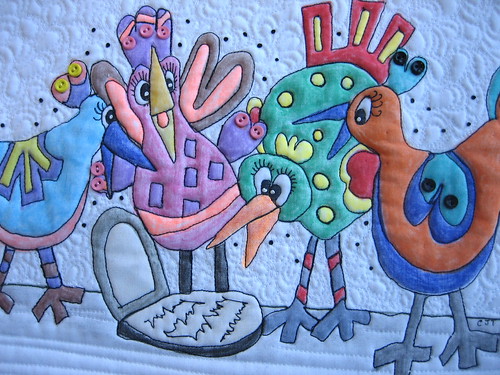
Here, you can see it after quilting, where I was doing the eyes. Nothing like a good poke in the eye, I say! LOL Note that the normal colonial knots were not on yet. (Yes, folks.....no french knots for this girl, although I might refer to them as french knots on occasion. Colonial knots are soooo much easier!!! And they never unknot!)

So here is the finished quilt. It ended up at 15 x 10 inches. I'm thinking a whole quilt made from these images would really be cute. Now, if I would only have time to finish the other 9 days!!

4 Calling Birds

4 Calling Birds

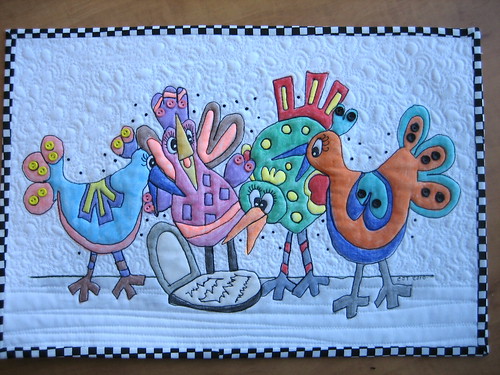
Just wait until you see "5 Golden Rings".......it will be a real hoot! I'm cracking myself up thinking of all these, believe me! I hope you chuckle as much as I do........until next time.....thanks for visiting!!!!

Friday, November 26, 2010

Happy Black Friday

Sorry, no sales here!!! Now isn't that a surprise?? Seems I'm the only one, I think, without a deal of some sort today. I have to admit that I was out and about earlier along with the rest of the "nuts", but no 3 am shopping excursion for this girl, thank you!! I think I left at 8 am and then I only went to Michael's which is really close to my house. I thought about stopping somewhere else, but the wind chill was only 4 degrees this morning, so I wasn't about to lolly-dolly around.

Today, like many of you, I'm busy with Christmas decorations and trying to get the tree up, plus trying to finish something which is turning out really cute. You'll see it on the next post. Right now though I want to show you my loot from the Mug Rug Swap that I got from Gayle yesterday. So cute and so typically me. (My hubby did steal the rug of the truck though.....seems he needs some Christmas cheer in his office upstairs from what I was told.) LOL I bet you'll all be jealous......huh????

Swap package received from Gayle Brindley

I just want you all to know that I am thankful for all of you and for every comment you make on my blog. I appreciate each and every one of you!!! Life wouldn't be half as much fun if I didn't have someone to show my stuff to. (What a crummy sentence that was, huh??......don't report me to the English teachers, okay??)

Monday, November 22, 2010

Missing....2 turtle doves!

I know you are asking yourself, what is this crazy woman talking about now? Poor dear goes from one thing to the next with no rhyme or reason.......and you're right!!! But, my friends, do you remember this guy:

A Peacock in a Pear Tree

Ah-ha, now you know what I'm up to, I bet. Seems that I'm not such a hot shot drawer of turtles and need to work on that for a bit yet (thus the missing doves), BUT........(drum roll please........), I did finish 3 french hens so I thought I'd show them to you. (Incidentally, 4 Calling Birds are in the works and my brain is developing "however many geese a layin'" as I write this. (I always check the song to make sure that I'm pretty close to the original, mind you.) Seems my 12 days of Christmas will really be off numerically. LOL Oh well!!! Anyway, here are the 3 French Hens:

3 French Hens

(The top one is supposed to be a french maid. Apparently, I'm not too "up" on my maid costumes!!) I do like the bows in the back though. :D And a close up:

Details

Check out all those buttons!!! And I want you to know that I sewed them ALL on by hand too!

I hope that you all are proceeding with your colored mandalas from the last post. I finished another one this morning, but can't even take pics to show you since it's raining like crazy here. Hey, it could be worse! It could be snow.....ugh! Hope you have a fun week.

Now...back to my hens, geese, turkey, etc!

Missing....2 turtle doves!

Friday, November 19, 2010

Mandala #1

Isn't this blogging world a marvelous thing? I never knew I could get so much inspiration and grab so many ideas from my blogging friends. Just the other day, as I was reading from my blog list, I ran into something so interesting, I had to jump on it. My friend, Shayla, had created a beautiful embroidery from a site I had never heard of. Naturally, I had to link to it and I was amazed at the artistry. The beauty of the painted mandala was amazing. Now, I've painted in my life.....but I didn't think I needed to switch passions at this stage to obtain the same look. Thankfully, the blog owner had 5 free coloring pages ready for download for the public. (And guess what public person took advantage??) Man, I couldn't wait to grab those beauties from the printer although, I must admit they were a bit small for what I intended.

After looking them over, I decided to run to my local copy place to increase them to something workable and 135% was perfect! I'm telling you, I had already picked out colors in my head on my drive home.

For some reason, I've become a slacker, and it seems it's much easier for me lately to choose crayons than fabric. All those cute little things sitting on my table are so much easier than that dining room table loaded with decisions. Besides, I knew I'd never be able to piece such small stuff so it was a good excuse for me to do my trusty crayon method of making a quilt.

First, the pattern:

Naturally, as you've seen me explain in the past, I traced the image onto my fabric (and that took an age, believe me), backed it with freezer paper for stability and I was ready to go.

Oh, it was so much fun sharpening my crayons as I continued coloring. I'm telling you, that coloring process makes me smile every time. I guess I've never grown up! LOL

I wasn't sure if I should color in the background or not, so I didn't. To be honest, I wasn't quite sure at that point if I even really liked it. BUT, I sandwiched it anyway and decided to finish it. I started the outlining on the inside lines.

It sure was a challenge to try to get those lines smooth looking and I'm hoping the next one is better, but I tried my best. At this point, I was really wondering if anyone would see this. Sometimes stuff doesn't look so cool in process, but I was hoping it would "grow" on me. In any event, I had fun coloring so that's the way I was thinking!!! LOL

I actually surprised myself when it was done. I really liked it and then I was happy I had taken all these pictures along the way to show you. Now, I'm anxious to make another one and maybe one after that. After all, I did copy all 5 free coloring pages!! LOL

Mandala Quilt #1

Close-up

The buttons help...don't you think??? I bet you all are copying those pages yourself now, aren't you??? Ah-ha......I knew it!!! Enjoy!

Tuesday, November 16, 2010

Ummmm......

Oh me, oh my, what can I show you that's new? I have been working, but (again) I did make something for a swap and can't show you until my partner gets it.....and, believe it or not, I haven't even been assigned a partner yet for the swap. Nothing like being ahead of the game, huh? The theme is "Take Flight" which with my love for drawing birds, is right up my alley. I jumped right into that one, believe me and it is cute.......only about 8x10 though. Soon, people, soon....I promise.

I did make two more mug rugs though.....even though I can only show you one of them in full. I decided to personalize one for my partner and thank God she's already commented and likes it. Otherwise I'd have to find someone with the same name to gift. LOL (Can you just see me do that?) Funny!

The White Tree

Snowman Mug Rug

I'll probably send that out soon after the 22nd mailing date, so I'll re-post him after that so you can see the whole thing.

Other than that, not much new. I have a new project planned that I want to try with my beloved crayon technique and who knows if it'll work. Then, too, I want to do some more little quilts for the 12 days of Christmas. I have some crazy ideas!! Can't you just imagine the 3 French Hens!

Until next time, thanks for visiting and have a wonderful day!!! I better get crackin' on some creations!

Thursday, November 11, 2010

One Design 2 1/2 ways

Here I was all excited to show you something really neat......but that's not what will happen, unfortunately. :( I wanted to do 3 quilts using 3 different techniques all with the same design and let you pick your favorite.

Some time ago when I was doing the doll swap, there was a quilter who made a gorgeous quilt using a colored pencil technique of coloring her fabric. I lost the blog for awhile, but just the other day, re-found it and really was excited to show you. I gathered my stuff:

My super expensive colored pencil set from 1000 years ago when I used to make cards, and do drawings for fun.............lookie at all those 120 gorgeous colors.................

Then, my textile medium and brushes that I just bought recently for this demonstration. I was all set. I read over her blog referring to her instructions for the fabric tinting tutorial and I thought I was ready to go.
First, I prepared my fabric the same way as I do when I color it with crayons, tracing my design, and ironing freezer paper to the back. I did exactly what she said with my pencils, coloring them on as I wanted and then painted each section with the medium, washing my brush after each application to a different section and color.

Tell me why then , did my green run onto my white fabric???? Can you see that section right there at the top of that green bow? That wouldn't work!! UGLY!!! No way would I use that mess! In fact I wasn't crazy about the colors in the first place!! You'd think with 120 colors, they'd at least have a decent red!!! UGH!!!

Needless to say, I never finished this one.......and I will NEVER use the colored pencil technique again either. I'll stick to my other favorites........applique:

Merry Christmas Mug Rug

And crayons:

Happy Birthday Mug Rug

After all, how many techniques does a girl need anyway????? Two is plenty for me, thank you!!

Monday, November 8, 2010

Still at It

Just so you don't think that I sit around here all day and do nothing, I want to show you what I did this morning BEFORE I cleaned the house.......

3 Christmas Cupcakes

I actually drew it yesterday and couldn't wait to put it together. I knew the "sprinkles" would be the crowning glory!! He-he! When my kids were little, they wouldn't touch ice cream or donuts that didn't have sprinkles on top. And my daughter always insisted on a cherry too! This little mug rug would be right up her alley. (I won't show her though........she already stole Goosey Lucy last night......so how many mug rugs does she need anyhow?)

My favorite is this one though:

A Peacock in a Pear Tree

Ever since the doll swap, I've been itching to do another crayon quilt. Actually, I didn't originally plan on doing this one that way, but after I looked at the amount of feathers, and wondered how I'd keep them all straight with applique, I decided that crayons would be my best bet. I love how he turned out and I am staring at him hanging in my kitchen right now. I named it, "A peacock in a pear tree" for obvious reasons. Just wait for the rest of the 12 days of Christmas. You can only imagine what 4 calling birds might look like, can't you???? How fun! I have all sorts of whimsical stuff swimming in my head. (Incidentally, if you want a brush up course on how to do the crayon procedure, here is a link to my tutorial: http://mamacjt.blogspot.com/2010/08/flowers-by-mail.html) The only thing I did differently this time, is I used a #30 weight black thread rather than the #12 pearl cotton. The #12 perle would have been too thick for that many lines and I would have had a million ends to bury.

I also can show you a beauty of a placemat that I received from suejoy today. She was my swap partner for that swap. I just love it.

My placemat from suejoy

So that's it until next time. Who knows what will be next? With me, you just never know!!! I sure hope you have fun seeing all my stuff as much as I LOVE making it. Come back....please?? It's so much more fun to share.


Saturday, November 6, 2010

I applique backwards?

Just the other day, when shopping at my neighborhood quilt shop, I picked up a new book that was lying on the counter just because of the awesome letters and numbers. (I can draw, but quite honestly, my letters really suck so I thought this might help)?? LOL That night, when I had some time to page through the book, I actually read the instructions and came to the realization that I have been doing applique WRONG all this time. Me.....the applique queen? Wrong??? Apparently, everyone actually prints their patterns backwards.......WHAT??? And puts them on the fused fabric that way??? On the backside? Why?

Let me tell you how I do it. First, of course, you need a pattern......in this case, we will use my latest, "Goosey Lucy". She didn't turn out as cool as I thought, but what the heck?


First, I cut my background fabric the same size as my pattern, OR sometimes, slightly bigger to accommodate the eventual quilting, or maybe just because I think I need some extra on the sides. (I tend to draw right to the line and forget that the binding will cover stuff up.) Duh!

Then, I choose my fabrics for each of the things I want colored in the drawing. In this case (which is really unusual) I used a colored background so I had to be more careful with fabrics that didn't clash. When I am sure of my choices, I check out the pattern for approximate sizes and cut my fabric to the size I think I'll need and iron fusing web to all of the squares or rectangles. I might use a bit more fabric this way and fusing stuff, but believe me, it's soooo much easier. (And you don't make a mess of your iron or ironing board cover either.) So here we have most of the fabrics I choose with the fusing stuff already ironed on the back (although I think there's a fabric missing......oh well...

Then, get yourself some tracing paper at the office supply store and grab a nice pencil and trace the items you want to applique right from your drawing. (You might have to number different things on the drawing and on the tracings to keep them all straight if there are lots of items with the same fabric.) Then, you put those tracings on top of the fabric (right side up) and just cut them out, one by one until you have the whole thing done. (Number the back of the cut out pieces if you have lots with the same fabric following your numbering system from before.) See the three pieces of white with red dots? They are numbered 1, 2, 3 on the back....the same as the original drawing.

You can do it in sections of you want and when I have something pretty big, I do it in sections too, otherwise, you'll go nuts and won't remember what is what. (Been there, done that!!) SO...when you are done with the tracing and cutting, take the drawing, the background piece of fabric and your "cuttings" over to the ironing board, and as close as possible, position the pieces onto the background fabric until you have it to your liking. (Often I will place the original drawing right on top of the fabric to get an idea of the placement of the first few pieces.) Do not iron anything until it is to your satisfaction, and once that is done, you iron the whole mess down at one time to fuse it forever. Then, just finish it in the normal manner.

And when you're done, you might have yourself a "Goosey Lucy" huge mug rug too which is almost big enough for a sheet cake. LOL (I did get a bit carried away with this one!!)

Goosey Lucy Mug Rug

Tuesday, November 2, 2010

I'm in a holiday mood, I guess.

I don't even have my Christmas fabric upstairs yet, but still I have been thinking, dreaming, and making Christmas stuff. First, on Sunday (after I finished my 12th batch of cookies for the freezer), I made this cute little guy.

Mug Rug for a Dear Friend

I found him in the Target flyer and knew he had to be transformed into fabric for my two "dear" friends who I was meeting with on Monday. The red collar is really red ribbon, so it is shiny and looks really neat next to the solids.

Then, today I made this:

Holiday Mug Rug

This might be for the latest mug rug swap. I joined it again and have a partner who really doesn't care what kind of mug rug I make for her. (Doesn't give me a lot to go on, but then again, it's kind of neat for my weird creativity too.) I have three weeks before I have to send one out, so who knows what else I'll think of by then. Right now I have a few doll size quilts that need to "come out" of my head so I might just do them first. I'm also dying to make another crayon quilt. Those are sooooo much fun! Stay tuned........who knows what'll I'll show you next. (Maybe even all those cookies in the freezer. LOL)